Simple Sourdough Bread Recipe with June the Starter
Equipment
- What You'll Need
- Big mixing bowl
- Kitchen scale
- Bench scraper
- Clean kitchen towel
- Dutch oven with lid
- Proofing basket or bowl with towel
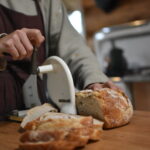
- Sharp knife for scoring razor blade
Ingredients
Ingredients
- 100 g active June starter or one you made
- 475 g unbleached organic all-purpose flour available at most grocery stores
- 325 g filtered water
- 10 g salt
Instructions
Rehydrating June Starter
- Take your dehydrated June starter chips and break them into smaller pieces
- In a clean jar, mix together:
- 2 tablespoons (30g) room temperature filtered water
- 2 tablespoons (30g) unbleached organic all-purpose flour
- First Feeding Schedule:
- Cover loosely and wait 24 hours
- After 24 hours, discard half the mixture
- Feed with 30g flour and 30g water
- Repeat this feeding every 24 hours for 2-4 days
How to Know June is Ready:
- The most important sign: June will double in size!
- When you see June double in size between feedings, she's ready to make bread
- This usually takes 2-4 days of regular feedings depending of room temp
- Now you can start your regular feeding schedule and begin baking
Evening Recipe (Start after dinner)
- Making the Dough
- In your big bowl, mix together:
- 325g water
- 100g June starter
- 500g bread flour
- 10g salt
- Mix everything until you don't see any dry flour.
- Cover your bowl with a kitchen towel.
Evening Stretches
- Over the next few hours before bed, come back to the dough 2-3 times
- Each time, grab the dough from one side, stretch it up and fold it over
- Turn your bowl and repeat on all sides
- Don't worry if you only get one stretch in before falling asleep - the bread will still turn out fine!
- Cover between each stretch
Overnight
- Leave your covered dough on the counter overnight
- The dough will rise and get bubbly while you sleep
Next Morning
- Dump your dough onto a floured counter
- This is when you really work the dough:
- Stretch and fold it several times
- Really work it well as you shape it into a round
- Keep folding and shaping until it feels tight and smooth
- Put it in your proofing basket or towel-lined bowl
- Dust your basket/bowl well with flour first
- Place dough smooth side down
- Cover with a towel
- Put it in the fridge until you're ready to bake
- Can stay in fridge anywhere from 4-24 hours
- Bake whenever it fits your schedule
Baking Time
⚠️ SAFETY FIRST - BURN WARNING ⚠️
- The Dutch oven and lid will be EXTREMELY hot at 500°F. Burns happen easily, especially:
- When removing the lid after the first 25 minutes
- If you accidentally touch any part of the pot
- When you forget the lid is hot (this happens to everyone!)
- Always use thick oven mitts and stay focused when handling the Dutch oven.
- Put your Dutch oven in the oven and heat to 500°F
- Let it heat up for about 30 minutes
- Yes, 500°F is hot! This high heat gives you a great crust
- Take your dough out of the fridge:
- Flip it onto parchment paper
- Cut a slash across the top
- Put it in your hot Dutch oven
- Be extra careful - use good oven mitts!
- Bake covered at 500°F for 25 minutes
- CAREFULLY remove lid (this is when most burns happen!)
- Keep your arms and face away from the steam
- Put the hot lid somewhere safe where no one will touch it
- Lower temperature to 475°F
- Bake another 15 minutes until deep brown
Notes
Note